How to Make a Windows 11 USB with Rufus 4.15
Rufus is a small, free tool that turns a USB stick into a bootable Windows installer, and it does a few things the official tools do not. The version covered here, 4.15, came out at the end of June 2026 and was the newest release when this was written. Here is how to get it, set it up and make a Windows 11 USB, plus what each of the options in the Windows setup window does.
The steps below follow the screens in the order you meet them. Where an option has a downside, I say so, because a few of them bypass Windows checks or change how the PC boots.
KEY TAKEAWAYS
- Download Rufus only from rufus.ie. It is one small file, with no installer.
- Rufus erases the USB drive completely, so back up anything on it first. Use a drive of 8 GB or more.
- For most modern PCs choose GPT with a UEFI target. Use MBR only for older BIOS machines.
- The Windows options can skip the TPM, Secure Boot and RAM checks, and the Microsoft account. Microsoft does not guarantee updates for PCs that fail the requirements.
IN THIS GUIDE
Prefer to watch? Here is the video, and the steps below link to their moments in it.
What is new in Rufus 4.15
According to the release notes on GitHub, version 4.15 is mostly a maintenance update:
- UEFI:NTFS, the part that lets Rufus boot NTFS drives, now supports RISC-V 64 computers.
- A silent Windows installation that stalled at 75% is fixed, and the option has safer checks so it cannot be combined with incompatible settings.
- A boot crash on Snapdragon X ARM64 laptops when using UEFI:NTFS is fixed.
- The first Windows User Experience option is no longer ticked by default, and the “Enable runtime UEFI media validation” checkbox now enables properly.
- An infinite loop with Windows ISOs that contain several WIM files is fixed.
- Cancelling during write retries and the progress display for compressed image extraction both work better.
- Two security issues in the XML parser were fixed: unrestricted XML entity expansion and an integer overflow.
Newer versions may exist by the time you read this, so download the latest one from the official site. The screens and options below stay much the same from one version to the next. The video walks through version 4.15.
Watch this step in the video (1:39)
Get Rufus from the official site
Open your browser and search for Rufus, or go straight to rufus.ie. Check that the address is the official one before you download anything, because a fake download of a small .exe file is an easy way to pick up malware.
On the download section you will see a standard version and a portable version, and builds for 64-bit, 32-bit (x86) and ARM64 PCs. Pick the one that matches your computer. Most modern PCs need the 64-bit version. Rufus 4 runs on Windows 8 or later.
Save the file somewhere you can find it. Rufus does not install: it is a single small file of a couple of megabytes, and double-clicking it opens the program.
Watch this step in the video (0:25)
Download a Windows 11 ISO
Rufus needs an ISO file, which is a disc image of Windows. The safest source is Microsoft’s own Windows 11 download page. Scroll to “Download Windows 11 Disk Image (ISO)”, choose the Windows 11 multi-edition ISO, pick your language and download the 64-bit file. It is several gigabytes, so it takes a while.
Rufus can also download an ISO for you from inside the program, using a small arrow next to the Select button in current versions. Either way, avoid ISOs from random sites.
Watch this step in the video (5:42)
Plug in and prepare the USB drive
Use a USB drive of at least 8 GB (a 16 GB stick is a comfortable choice). Rufus erases everything on it, so copy anything you want to keep first.
THE USB DRIVE WILL BE ERASED
Rufus wipes the whole drive before it copies Windows over. Double-check that the drive shown under Device is the one you plugged in, especially if you also have an external hard drive connected.
Choose the device and the ISO
Open Rufus. Under Device, the drop-down lists the storage devices connected to your PC. Select your USB stick. Under Boot selection, leave it on Disk or ISO image, which is the right choice for installing Windows or Linux, then click Select and pick the ISO you downloaded.
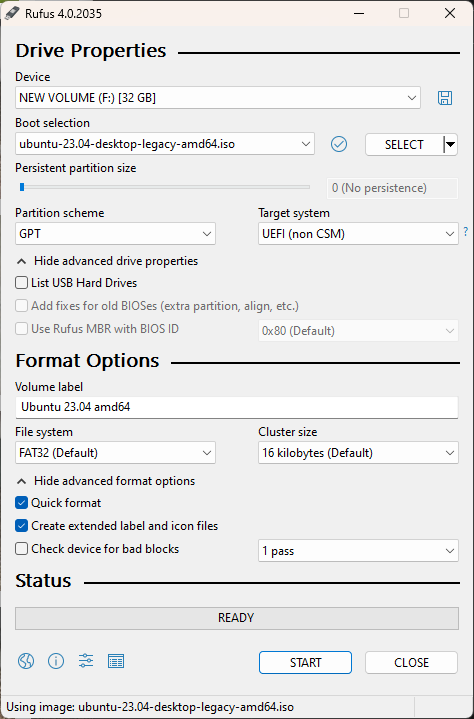
There is a check mark button next to the boot selection area that calculates MD5, SHA-1 and SHA-256 checksums for the ISO. You can compare those with the values published by the source to make sure the file is not corrupt.
Watch this step in the video (2:45)
Partition scheme and target system
The Partition scheme tells the drive how to organize its space, and it has to match your computer’s firmware. GPT is the modern choice for PCs that use UEFI, which covers most newer computers. MBR is for older PCs that use legacy BIOS. After you pick one, the Target system box adjusts itself to match. If you are not sure, leave the defaults Rufus chose from your ISO.
Under the advanced drive properties there are extra options such as listing USB hard drives, adding fixes for old BIOSes and enabling runtime UEFI media validation. You can leave all of them as they are.
Watch this step in the video (4:07)
Format options
This section controls how the drive is wiped and set up. The Volume label is just a name, such as Windows 11 Setup. The File system is picked automatically from your ISO, and the Cluster size is best left on its default. Quick format clears the file table without checking every sector for bad blocks, which is fine for a healthy drive.
When you press Start, the status area at the bottom turns into a progress bar that shows what Rufus is doing, such as formatting, copying files and installing the boot loader.
Watch this step in the video (5:02)
Windows User Experience options
After you click Start with a Windows ISO, Rufus opens a window of options that change the installer before you ever boot from the USB. The exact wording changes a little between versions, so read the labels on your screen. Here is what each one does and when it makes sense.
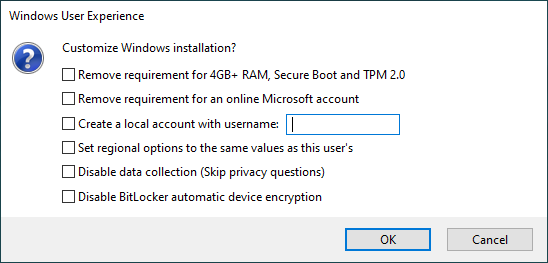
- Remove requirement for 4 GB+ RAM, Secure Boot and TPM 2.0. Windows 11 refuses to install on PCs that fail these checks. This option makes the installer skip them. It does not add the missing hardware, and Microsoft says such PCs are not guaranteed to receive updates, including security updates. Use it only if you accept that.
- Remove requirement for an online Microsoft account. Lets you finish setup with a local account instead of signing in to Microsoft.
- Create a local account with username. Fills in a local account name for you. Tick the box and type the name you want.
- Set regional options. Copies the language, time zone and keyboard layout from the PC you are using, so Windows does not ask for them during setup.
- Disable data collection. Answers No to the privacy questions, such as location, diagnostic data and personalized ads.
- Disable BitLocker automatic device encryption. On supported hardware Windows 11 can turn on drive encryption in the background. Turning this off avoids the extra step of managing a recovery key, but it also leaves the drive unencrypted, which matters if a laptop is ever lost or stolen.
- Quality of life tweaks. Newer versions can apply tweaks such as stopping Windows from pinning cloud services and AI tools, and turning off Fast Startup, which can cause trouble with drivers or with dual booting Linux.
- Use Windows CA 2023 signed bootloaders. Microsoft is replacing the Secure Boot certificates that were issued in 2011, and some PCs now trust only the newer 2023 certificates. This option makes the USB use boot files signed with the 2023 certificate. Tick it only if the PC you will boot is fully updated, including its BIOS or UEFI firmware, otherwise the USB may fail to boot.
TICK ONLY WHAT YOU NEED
Only tick what you need. The account and privacy options are low risk. The hardware requirement bypass and the CA 2023 option change how the PC boots and updates, so use them deliberately. If the USB does not boot on a particular PC, recreate it with the CA 2023 option switched the other way.
Watch this step in the video (6:47)
Write the drive and check it
Click OK. A warning tells you that continuing will wipe the USB drive, so make sure your files are backed up and click OK again. The status area then shows the ISO files being copied with a percentage. It takes a few minutes, and it is done when the bar says Ready.
Open File Explorer and you will see the drive under the name you gave it. The Windows files are on it, including setup.exe.
Watch this step in the video (9:56)
Install Windows 11
There are two ways to use the drive. From inside Windows you can double-click setup.exe on the USB and follow the installer, which is how you would upgrade or repair the PC you are using. For a clean install on a PC or a blank drive, restart the computer and boot from the USB. Most PCs open a boot menu with a key pressed at startup, often F12, F10 or Esc, and the key varies by manufacturer.
Before you install, back up your files. A clean install erases the drive you install onto.
ABOUT BYPASSING WINDOWS 11 REQUIREMENTS
Microsoft has said that PCs that do not meet the Windows 11 requirements are not guaranteed to receive updates, including security updates. In practice many such PCs keep getting patches, but that can change. Without TPM 2.0 you also lose some hardware-backed protections, such as BitLocker with a TPM and parts of Windows Hello.
Questions people ask
Is Rufus safe?
Rufus is a well-known open source tool, and the program itself is safe when you get it from rufus.ie. The risk is fake download sites, which is why the official address matters.
Will Rufus erase my USB drive?
Yes. Everything on the drive is deleted when Rufus writes it, so back up your files first and check that you selected the right drive.
Should I pick GPT or MBR?
Pick GPT with a UEFI target for most modern PCs. MBR with a BIOS target is for older machines. If your ISO is a standard Windows 11 one, Rufus usually suggests the right combination.
Can I install Windows 11 on an old PC with Rufus?
Rufus can make the installer skip the TPM, Secure Boot and RAM checks. Microsoft does not guarantee updates for PCs that fail the requirements, so think about whether you are comfortable with that.
My USB will not boot. What can I try?
Check that the PC is set to boot from USB in its boot menu, make sure the partition scheme matches the PC, and recreate the drive. If you ticked the CA 2023 option, try again with it off, or update the PC’s BIOS or UEFI firmware.
Can I use Rufus for Linux?
Yes. Rufus works with Linux ISO files too. Choose the ISO, leave Disk or ISO image selected, and write the drive in the same way.
Did Rufus work for you? Tell me in the comments which options you used and what PC you installed on.